Vaccine Model
Resources:
- Section 4 Code Files
Now, see the class diagram of our project. In this section, we are going to implement this design using Django models. First, let us start with the vaccine model.
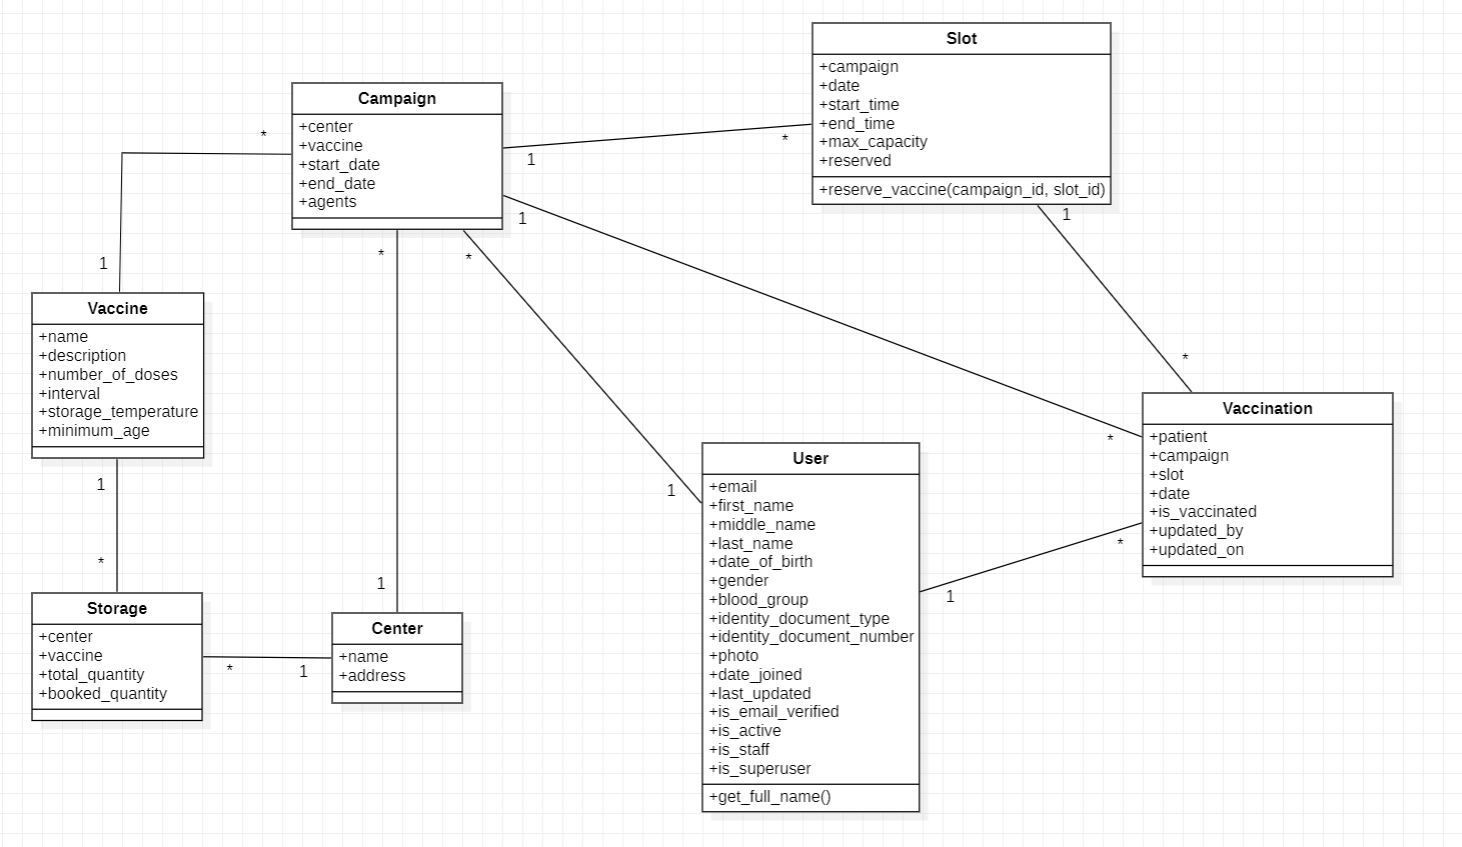
In the diagram, you can see the vaccine class which is present on the left side of the screen, and in that class, you can see class attributes like name, description, number_of_doses, interval, storage_temperature, and minimum age.
Now, let us try to create a vaccine model.
-
First of all, download the section 4 project code files from the resources section.
-
Extract the file in the desktop or in any folder in which you are working.
-
Open the "Section 4 Code file" folder and then open the "Vaccination Scheduling Application main" folder.
-
Copy the mysite folder and move back to the project where you were working initially.
-
Replace the mysite folder of your project with the mysite folder which you have copied.
-
We are following this approach because if you have made any mistake while writing the code in the previous section then it won't affect your learning in this section. So, at the start of every section, you will need to download the project code file and replace the mysite folder with the mysite of your project directory.
-
Now, open the vs code and open your project directory.
-
Make sure the virtual environment is activated in the terminal and vs code workspace.
-
First of all, open model.py file of the vaccine app.
-
As we have learned, to create a model, we need to create a python class and inherit the Model from django.db.models.
class Vaccine(models.Model):
Now, let us add some database fields to this vaccine model.
name = models.CharField("Vaccine Name", max_length=32)
Here, CharField is the model field type. In the first argument, we have provided the Vaccine Name. This is called a verbose name.
You can think of this verbose name as a name you want to give to this database field. In the second argument, we have provided max_length=32 which is a model field option.
So, this database field name is Vaccine Name and it stores data in Character Format. Whereas, it can store 32 characters only in the database column.
description = models.TextField(max_length=1024)
Here, TextField is the model field type. We use TextField for storing a large number of characters and the max_length is set to 1024.
Now, We have to store the number of doses for a vaccine. So, we will be using IntegerField as the model field type.
number_of_doses = models.IntegerField(default=1)
Here, We have written default = 1 which means the default value of this field will always be 1.
interval = models.IntegerField(default=0, help_text="Provide interval in days")
Here, the interval stores the days between two consecutive vaccination. We will use IntegerField as the model field type, the default value of this field will be 0 and
We will use another model field option known as help text. Using help text, we can provide some additional information about that field. So, we are telling the user to provide interval values in days, not in months or weeks.
storage_temperature = models.IntegerField(null=True, blank=True, help_text="Provide Temperature in Celcius")
Here, in the storage temperature, we will use IntegerField as the model field type. When we set null = True in the model field option, then it means that this field can store a null value and we are setting blank=True which means that Django will not force the user to enter the value in this field.
minimum_age = models.IntegerField(default=0)
At last, we have a minimum age field. We will be using IntegerField as the model field type and the default value of this field is set to 0.
Finally, add the str method to represent each Vaccine object in human readable form.
def __str__(self):
    return self.name
Using the str method, we can give the name to the object and these names will appear in our Django Templates and Admin Panel.
In this way, we have learned how to write a model in Django. Now, this is the time to learn about migration.
As I have said to you earlier, Django ORM will look up your Python code and create a migration file. In that migration file, all the changes which have to be applied to the database are stored. So, let us learn how to create a migration file.
Open a new terminal, execute this command,
cd mysite
python manage.py makemigrations
Using this command, Django ORM will create a migration file named 0001_initial in the migration folder of our vaccine app.
In this migration file, all the changes which have to be applied in the database are stored by the Django ORM in their format.
Now, we need to migrate these changes to the database. So, execute this command
python manage.py migrate
Using this command, we have applied the changes stored in the migration file to the database. Since we have not configured any database, so Django creates an SQLite database by default. Therefore, we no need to worry about database configuration as of now.
Now, we need to create a superuser account to open our django admin panel.
python manage.py createsuperuser
Username: admin
Email: admin@admin.com
Password: abcde@12345
After that, open the development server.
And then, open the admin panel by visiting this URL: 127.0.0.1:8000/admin
Provide valid credentials to log in.
Currently, we have not registered our vaccine model in the Django admin panel.
So, first of all, open admin.py file of the vaccine app.
Add this code to register the Vaccine model in the admin panel.
from vaccine.models import Vaccine

admin.site.register(Vaccine)
Now, open the admin panel and you can perform CRUD operation with the Vaccine Model.